
Receta de Pastelitos Rellenos de Crema de Chocolate
Disfruta de estos deliciosos pastelitos de crema de chocolate, un dulce que seguro satisfará tu antojo. Con una base de pastel de chocolate suave y húmeda, rellena de una cremosa ganache de chocolate, estos pastelitos son perfectos para los amantes del chocolate. Disfrútalos como postre o como merienda para un antojo irresistible.
Deliciosos Cupcakes de Chocolate con Relleno de Crema de Vainilla
Estos cupcakes de chocolate son irresistibles. Con un sabor intenso a chocolate y un centro cremoso de vainilla, estn cubiertos con un glaseado de chocolate suave que se derrite en la boca. Utilizando cacao negro, el color y sabor se intensifican, pero tambin se pueden usar otros tipos de cacao sin azcar para obtener excelentes resultados. Son ideales para cualquier celebracin o reunin.
Ingredientes
- 1/2 taza de mantequilla sin sal, a temperatura ambiente, y un poco ms para engrasar
- 1/2 taza de cacao en polvo sin azcar
- 1/2 taza de agua hirviendo
- 1 1/4 tazas de harina de trigo
- 1 cucharadita de polvo de hornear
- 1/2 cucharadita de sal fina
- 1 1/4 tazas ms 2 cucharadas de azcar granulada, separadas
- 2 huevos grandes, a temperatura ambiente
- 3 1/2 cucharaditas de extracto de vainilla, divididas
- 1/4 taza de crema espesa
- 1/4 taza ms 1 1/2 cucharaditas de jarabe de maz claro, separado
- 1/4 taza de agua
- 2 claras de huevo grandes
- 1/4 cucharadita de cremor trtaro
- 1/4 taza de mantequilla sin sal, cortada en cubos
- 4 onzas de chocolate amargo
Instrucciones
Paso 1: Preparar el Horno y el Molde
Precalienta el horno a 175C (350F) y coloca la rejilla en el centro. Engrasa ligeramente un molde para 12 cupcakes y coloca un molde de papel en cada hueco.
Paso 2: Preparar la Base de Cacao
En un tazn pequeo apto para calor, mezcla el cacao en polvo con el agua hirviendo hasta obtener una mezcla homognea y sin grumos.
Paso 3: Mezclar los Ingredientes Secos
En un bol mediano, tamiza la harina, el polvo de hornear y la sal. Reserva esta mezcla para ms adelante.
Paso 4: Batir la Mantequilla y el Azcar
Con la batidora de pie equipada con el accesorio de pala, bate la mantequilla junto con 1 1/4 tazas de azcar a velocidad media hasta que la mezcla se aclare y est esponjosa, aproximadamente 4-5 minutos. Raspa los lados del bol para asegurarte de que todo se mezcle bien.
Paso 5: Agregar los Huevos y la Vainilla
Incorpora los huevos, uno a la vez, batiendo bien despus de cada adicin. Aade 1 1/2 cucharaditas de extracto de vainilla y mezcla hasta obtener una textura suave y homognea.
Paso 6: Mezclar la Masa
Agrega la mezcla de harina en tres partes, alternando con el cacao disuelto, comenzando y terminando con la harina. Aade la crema espesa y mezcla bien hasta conseguir una masa suave y sedosa.
Paso 7: Llenar los Molde de Cupcakes
Distribuye la masa de manera uniforme en los moldes, llenndolos hasta tres cuartas partes de su capacidad para un buen crecimiento.
Paso 8: Hornear
Hornea durante 22-25 minutos o hasta que al insertar un palillo en el centro, ste salga limpio o con migas hmedas. Deja enfriar durante 5 minutos en el molde y luego transfirelos a una rejilla para que se enfren por completo.
Paso 9: Preparar el Jarabe de Azcar
En una cacerola pequea, combina 2 cucharadas de azcar, 1 1/2 cucharadas de jarabe de maz y agua. Cocina a fuego medio hasta que el azcar se disuelva, luego deja de remover. Usa un pincel de repostera mojado para limpiar los cristales de azcar en los bordes de la cacerola. Cocina sin remover hasta que la mezcla alcance los 110C (230F).
Paso 10: Batir las Claras de Huevo
Mientras se cocina el jarabe, bate las claras de huevo con el cremor trtaro en un bol limpio y seco a velocidad media-alta. Cuando el jarabe llegue a los 110C, virtelo lentamente sobre las claras mientras sigues batiendo hasta que se formen picos suaves, lo que tomar entre 6 y 8 minutos. Agrega las 2 cucharaditas restantes de extracto de vainilla.
Paso 11: Rellenar los Cupcakes con la Crema de Vainilla
Coloca la crema de vainilla en una manga pastelera con una boquilla de 1.5 cm. Haz un pequeo hueco en el centro de cada cupcake enfriado y rellnalo con la crema. Luego, cubre con un pequeo trozo del bizcocho retirado. Coloca los cupcakes en el congelador durante 15 minutos para que el relleno se estabilice.
Paso 12: Preparar el Glaseado de Chocolate
Derrite la mantequilla en cubos junto con el chocolate y 1 1/2 cucharaditas de jarabe de maz en un bol resistente al calor colocado sobre agua hirviendo. Remueve de vez en cuando hasta que se derrita completamente y la mezcla sea suave. Retira del fuego y deja reposar durante 5 minutos. Remueve nuevamente antes de usar.
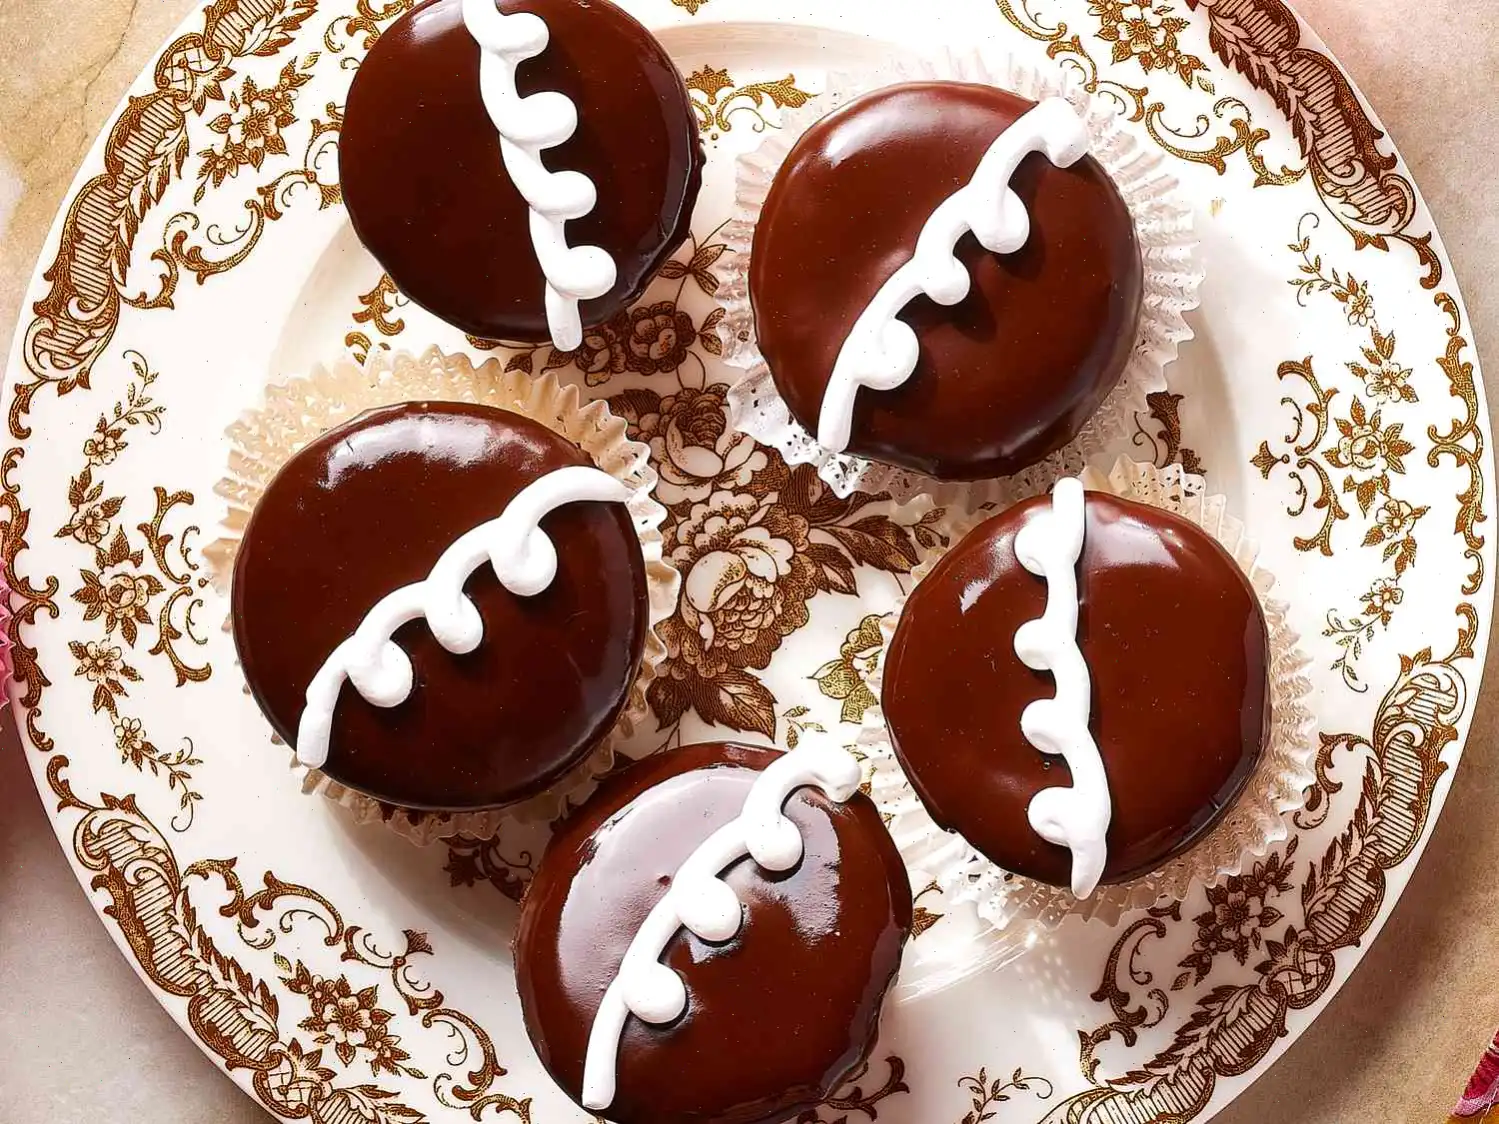
Paso 13: Glasear los Cupcakes
Sumerge la parte superior de cada cupcake en el glaseado de chocolate, dejando que el exceso se escurra. Coloca los cupcakes en una rejilla y deja que el glaseado se fije completamente. Si deseas un acabado ms brillante, refrigralos un poco y repite el proceso de glaseado.
Paso 14: Decoracin Opcional
Si tienes crema de vainilla sobrante, puedes usarla para decorar la parte superior de los cupcakes. Luego, gurdalos en un recipiente hermtico en el refrigerador, donde se conservarn durante hasta 4 das.
Valores Nutricionales por Cupcake
- Caloras: 501
- Grasas: 20g
- Carbohidratos: 79g
- Protenas: 5g
- Sodio: 181mg
- Colesterol: 67mg
- Grasas Saturadas: 12g
- Hierro: 4mg
- Calcio: 52mg
- Potasio: 134mg
Los pasteles de chocolate con crema, tal como los conocemos hoy en da, tienen sus races en la mitad del siglo XX en Estados Unidos, una poca marcada por el auge de los alimentos convenientes y los postres empaquetados individualmente. Estos pasteles se hicieron populares durante las dcadas de 1950 y 1960, cuando las empresas buscaban golosinas porttiles y estables en estantera que combinaran pastel de chocolate con rellenos cremosos. Inspirados en los pasteles europeos, particularmente el petit four francs, los panaderos estadounidenses adaptaron el concepto en porciones del tamao de un bocadillo con un recubrimiento de chocolate y un centro de crema suave y de vainilla. Su bajo costo, facilidad de produccin masiva y sabor indulgente rpidamente los convirtieron en un elemento bsico en los hogares y loncheras en todo Estados Unidos.
Variaciones Regionales y Caractersticas
Aunque los pasteles de chocolate con crema estn ampliamente asociados con la cocina estadounidense, han surgido adaptaciones regionales. En el Medio Oeste, los pasteles suelen tener un bizcocho de chocolate ligeramente ms denso y un glaseado ms firme para resistir el envo. Las versiones del sur pueden incluir un toque de bourbon o espresso en el chocolate para darle mayor profundidad al sabor, mientras que en las panaderas de la Costa Oeste, a veces se utilizan ingredientes orgnicos o artesanales, destacando el chocolate y la crema de alta calidad. Estas diferencias sutiles reflejan los gustos y los ingredientes locales, pero mantienen la estructura esencial del pastel, el relleno de crema y el recubrimiento de chocolate.
Cmo se Diferencian de Postres Similares
Los pasteles de chocolate con crema se distinguen de postres similares como los cupcakes o los clairs de chocolate. A diferencia de un cupcake tradicional, el interior est parcialmente hueco para crear un espacio para la crema esponjosa, y el exterior est sumergido en un glaseado de chocolate brillante en lugar de ser cubierto con crema. En comparacin con los clairs, estos pasteles tienen un bizcocho suave en lugar de la masa choux, y el recubrimiento de chocolate es ms firme y uniforme, lo que permite que el pastel sea empaquetado y consumido de forma prctica. Su portabilidad y la combinacin icnica de texturas: pastel suave, crema aireada y chocolate brillante, los distingue de otros dulces.
Contextos Comunes de Servicio
Estos pasteles se disfrutan ms comnmente como golosinas envueltas individualmente en loncheras, tiendas de conveniencia o en reuniones informales. Tambin suelen aparecer en eventos escolares, fiestas de oficina y picnics, donde los postres fciles de servir son preferidos. En panaderas o cafeteras, se venden en bandejas pequeas, a menudo refrigerados para mantener el relleno cremoso y el glaseado. A pesar de sus orgenes comerciales, las versiones caseras son cada vez ms populares, servidas junto con caf o t para un placer nostlgico.
Datos Interesantes
- Los primeros pasteles comerciales de chocolate con crema se produjeron en la dcada de 1950 y se comercializaron tanto como un postre como un tentempi conveniente para familias ocupadas.
- El relleno de crema de vainilla se estabiliza generalmente con una base de merengue, lo que permite que se mantenga esponjoso sin necesidad de refrigeracin por cortos perodos.
- El glaseado brillante de chocolate se aplica a menudo en dos capas para lograr un acabado suave y de espejo, una tcnica tomada de la confitera europea clsica.
- Algunas marcas nostlgicas se han convertido en conos culturales, apareciendo en programas de televisin, pelculas e incluso en recuerdos coleccionables.
- La popularidad de estos pasteles aument debido a su combinacin de un rico sabor a chocolate y un interior ligero y cremoso, creando un contraste que atrae tanto a nios como a adultos.
Preguntas frecuentes sobre Receta de Pastelitos Rellenos de Crema de Chocolate
Compartir

 audio version


CookGuide es tu guía culinaria para descubrir nuevos sabores y cocinar con confianza. Encuentra recetas de confianza, consejos prácticos e inspiración tanto para cocinas domésticas como profesionales.
Cualquier copia, distribución o uso de los materiales de este servicio sin autorización está estrictamente prohibido. Las infracciones serán procesadas según la legislación aplicable y pueden dar lugar a responsabilidades civiles y penales.
© Guía de cocina Studio 2026 | Cookies | Política de PrivacidadEncuentra la receta perfecta con IA. Solo introduce los ingredientes y deja que Cook te guíe hacia la magia.