
Receta del pastel de Smith Island
El pastel de la Isla Smith es un postre tradicional que viene de la Isla Smith, en Maryland. Este pastel de varias capas tiene finas capas de bizcocho amarillo con glaseado de chocolate entre cada capa. El resultado es un pastel húmedo y delicioso, perfecto para cualquier ocasión especial. Sigue esta receta para preparar tu propio pastel de la Isla Smith en casa.
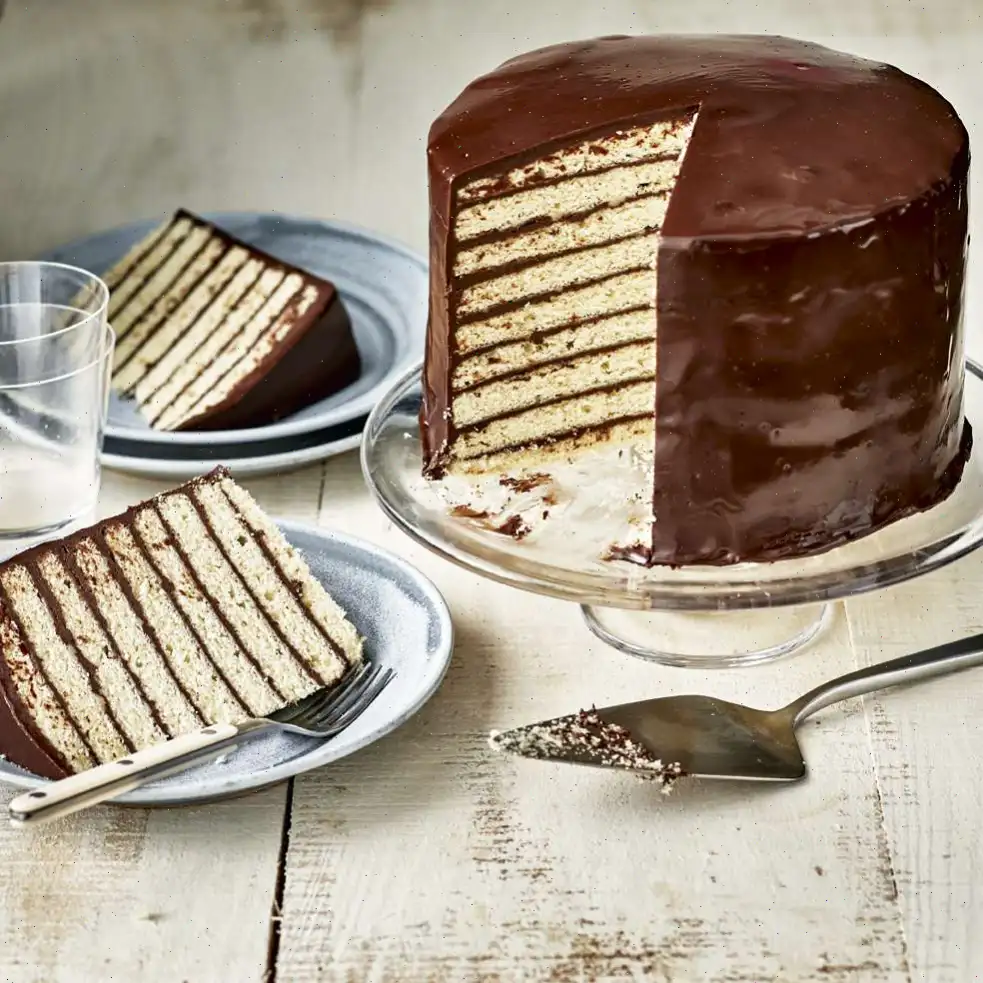
Rinde 16 porciones y ofrece un sabor intenso de chocolate con una cobertura cremosa y aterciopelada. A continuacin encontrars una gua completa para preparar este postre, paso a paso, de forma sencilla y deliciosa.
Ingredientes
Cobertura:
- 4 tazas de crema para batir
- taza de jarabe de maz claro
- 680 g de chocolate amargo para repostera, picado
- cucharadita de sal kosher
Bizcocho:
- Aerosol antiadherente para cocinar
- 340 g de mantequilla con sal, a temperatura ambiente
- 2 tazas de azcar blanca
- 5 huevos grandes, a temperatura ambiente
- 2 cucharaditas de extracto de vainilla
- 450 g de harina de trigo, tamizada
- 1 cucharaditas de polvo de hornear
- cucharadita de bicarbonato de sodio
- cucharadita de sal kosher
- 420 ml de suero de leche, a temperatura ambiente
Preparacin
Paso 1: Cobertura
En una cacerola mediana, mezcla la crema y el jarabe de maz a fuego medio. Remueve constantemente hasta que comience a hervir suavemente, luego retira del fuego.
Paso 2
Coloca el chocolate picado en un bol grande apto para microondas. Vierte la mezcla caliente de crema sobre el chocolate, aade la sal y deja reposar 2 minutos. Bate hasta obtener una textura uniforme. Deja que se enfre a temperatura ambiente durante aproximadamente una hora.
Paso 3
Cuando la cobertura est templada, refrigrala 45 minutos, removiendo a la mitad del tiempo, hasta que espese y pueda untarse fcilmente.
Paso 4: Bizcocho
Precalienta el horno a 175C. Engrasa nueve moldes redondos desechables de 22 cm de dimetro y cubre el fondo con papel de horno. Pulveriza ligeramente el papel con aceite en spray.
Paso 5
Con una batidora elctrica y el accesorio de pala, bate la mantequilla a velocidad media durante un minuto hasta que est cremosa. Incorpora el azcar gradualmente y bate 3 minutos hasta que la mezcla sea ligera y esponjosa.
Paso 6
Agrega los huevos uno por uno, mezclando ligeramente tras cada adicin. Aade la vainilla y mezcla de forma uniforme.
Paso 7
En otro recipiente, combina la harina tamizada, el polvo de hornear, el bicarbonato y la sal. Incorpora esta mezcla al batido de mantequilla alternando con el suero de leche, comenzando y terminando con la harina. Mezcla a velocidad media tras cada adicin.
Paso 8
Distribuye la masa de manera uniforme en los moldes preparados, aproximadamente 1 taza por molde. Alisa la superficie con una esptula.
Paso 9
Hornea cada tanda durante 12 a 14 minutos o hasta que al insertar un palillo en el centro salga limpio.
Paso 10
Deja enfriar los bizcochos 10 minutos dentro del molde sobre una rejilla. Luego, desmldalos y permite que se enfren completamente, unos 20 minutos ms.
Paso 11
Coloca la primera capa de bizcocho sobre una base de 20 cm. Extiende 1/3 taza de cobertura con una esptula pequea. Repite con las dems capas y la cobertura restante.
Paso 12
Cubre los laterales y la parte superior con una capa fina de cobertura. Refrigera 1 hora. Reserva la cobertura extra para el glaseado final.
Paso 13
Tras el enfriado, coloca la tarta sobre una rejilla con bandeja debajo. Derrite la cobertura reservada en el microondas al 50% de potencia, 30 segundos por vez, removiendo hasta que quede lquida y uniforme, aproximadamente 6090 segundos.
Paso 14
Vierte lentamente la cobertura sobre el centro de la tarta y deja que caiga hacia los bordes. Usa una esptula pequea para alisar los lados y rellenar huecos.
Paso 15
Refrigera nuevamente 1 hora hasta que la cobertura se fije.
Paso 16
Tras el ltimo enfriado, coloca la tarta en un plato de servir y deja que alcance temperatura ambiente antes de cortar. Disfruta!
Consejos
- Ensambla la tarta sobre una base y luego trasldala a un soporte para pasteles despus del segundo enfriado, para facilitar la manipulacin.
- Puedes usar moldes metlicos de 20 cm en lugar de desechables, enfriando entre capa y capa. Los desechables permiten hornear varias tandas sin esperar.
- No olvides cubrir los moldes con papel de horno para que las capas finas no se peguen.
El Pastel de la Isla Smith es un postre muy querido que proviene de la pequea y pintoresca Isla Smith, situada frente a la costa de Maryland, Estados Unidos. Con sus capas ricas y su decadente cobertura de ganache, este pastel se ha convertido en un smbolo del orgullo y la herencia local. Hoy en da, es reconocido como el postre oficial de Maryland, celebrando las tradiciones culinarias nicas de la isla. Pero, qu hace al Pastel de la Isla Smith tan especial y cmo se diferencia de otros pasteles americanos?
Historia y Origen
Los orgenes del Pastel de la Isla Smith se remontan al siglo XIX, cuando los habitantes de la isla comenzaron a elaborar pasteles de capas elaboradas para celebrar ocasiones especiales. La popularidad del pastel creci con los aos, especialmente entre las comunidades pesqueras locales. Originalmente, se haca para ser resistente y transportable, de modo que pudiera soportar largos viajes en bote hacia islas vecinas o el continente. Tambin era muy apreciado en reuniones familiares y durante las festividades.
En 2008, el Pastel de la Isla Smith fue oficialmente designado como el postre estatal de Maryland, reconociendo su importancia histrica y cultural. Normalmente, se elabora con capas de bizcocho de vainilla hmedo, separadas por ganache suave y sedosa, y cubierto con una capa de chocolate lisa. Aunque la receta ha evolucionado con el tiempo, su caracterstica estructura de mltiples capas y su cobertura indulgente se han mantenido constantes.
Caractersticas Regionales
La Isla Smith es un lugar nico en Maryland, conocido por su belleza rstica y su ritmo de vida pausado. El entorno martimo de la isla influye en los sabores e ingredientes de su cocina local. Por ejemplo, el Pastel de la Isla Smith a menudo incluye mantequilla y suero de leche, bsicos en la historia de la produccin lctea de la isla. Las capas del pastel suelen ser delgadas, siguiendo un mtodo tradicional que se ha transmitido de generacin en generacin. Este enfoque no solo mejora la textura, sino que tambin hace que el pastel sea ligero y aireado, a pesar de su riqueza.
Comparacin con Otros Postres
Aunque el Pastel de la Isla Smith comparte similitudes con otros pasteles americanos de capas, se distingue por su gran cantidad de capas. Normalmente contiene entre 8 y 10 capas delgadas, a diferencia de los pasteles comunes de una sola capa o incluso de los multilayer que no tienen tantas. Adems, su ganache de chocolate ligeramente amargo ofrece un contraste profundo con la dulzura del bizcocho, a diferencia de otros pasteles que usan buttercream o coberturas ms dulces.
En cambio, pasteles clsicos americanos o pasteles de cumpleaos suelen tener capas ms gruesas y densas, y su cobertura puede ser demasiado dulce. El equilibrio entre el bizcocho y la ganache es lo que le da al Pastel de la Isla Smith su sabor y textura distintivos.
Dnde se Sirve
Tradicionalmente, el Pastel de la Isla Smith se sirve en reuniones familiares, bodas y festivales locales en la zona de la Baha de Chesapeake. Su aparicin en el Festival anual de la Isla Smith es un smbolo de la cultura gastronmica de la regin. Sin embargo, en aos recientes, el pastel ha trascendido sus races locales y ahora se puede encontrar en panaderas, restaurantes e incluso en lnea, como un pedazo de la historia culinaria de Maryland. Tambin es un postre popular para llevar a reuniones, gracias a su impresionante altura y sabor irresistible.
Datos Interesantes
Uno de los aspectos ms fascinantes del Pastel de la Isla Smith es su construccin intrincada. Sus mltiples capas crean un efecto visual impresionante, mostrando un delicado apilamiento de bizcocho y ganache en cada porcin. Como las capas son muy delgadas, puede llevar varias horas hornear y montar el pastel, convirtindolo en un verdadero trabajo de amor. Algunos pasteleros incluso colorean las capas individuales, logrando una presentacin vibrante y festiva.
Otro dato interesante es que este pastel se disfruta a menudo con una taza de caf o t, lo que complementa la riqueza del ganache. Aunque el pastel es muy conocido en Maryland, sus races estn profundamente ligadas a la cultura de la isla, donde representa un smbolo de comunidad y tradicin.
Conclusin
El Pastel de la Isla Smith es ms que un postre; es una porcin de historia que conserva los sabores y tradiciones nicas de la isla de Maryland. Ya sea que lo disfrutes en un festival local o lo prepares para una celebracin familiar, este pastel ofrece un sabor del pasado mientras sigue siendo un favorito para los amantes de los postres de hoy. Con sus capas ricas, ganache aterciopelada y dulces recuerdos de la isla, es un pastel que merece ser saboreado sin importar de dnde vengas.
Puedes escuchar esta receta en formato de audio de IA. Simplemente haz clic en el botón de reproducción a continuación para escuchar el contenido en el formato que mejor te convenga. ¡Es una excelente manera de absorber información sobre la marcha!
Preguntas frecuentes sobre Receta del pastel de Smith Island
Compartir
Comentarios
Adam Rodriguez
05/01/2024 12:22:06 AM
¡Lo hice! ¡Tuve éxito! La receta quedó perfecta. Seguí todas las instrucciones y la preparé el día anterior.

 audio version


CookGuide es tu guía culinaria para descubrir nuevos sabores y cocinar con confianza. Encuentra recetas de confianza, consejos prácticos e inspiración tanto para cocinas domésticas como profesionales.
Cualquier copia, distribución o uso de los materiales de este servicio sin autorización está estrictamente prohibido. Las infracciones serán procesadas según la legislación aplicable y pueden dar lugar a responsabilidades civiles y penales.
© Guía de cocina Studio 2026 | Cookies | Política de PrivacidadEncuentra la receta perfecta con IA. Solo introduce los ingredientes y deja que Cook te guíe hacia la magia.