
Receta de Bolitas de Nieve de Chocolate y Ron
Estas Bolitas de Nieve de Chocolate y Ron son un delicioso capricho perfecto para la temporada navideña. Hechas con una base de chocolate rica y un toque de ron, estas bolitas pequeñas se cubren con azúcar glas para un acabado nevado. Son fáciles de hacer y aún más fáciles de comer, convirtiéndose en las favoritas tanto de niños como de adultos. Disfruta de estas golosinas en tu próxima reunión o regálalas caseras para repartir alegría navideña.
Esta receta es ideal para preparar con anticipacin, ya que las bolitas de ron ganan en sabor al reposar. Lo mejor es hacerlas al menos un da antes de servirlas. Aqu te mostramos cmo prepararlas:
Ingredientes
- 1 caja (311 g) de galletas de vainilla
- 3/4 taza de azcar glas, ms extra para rebozar
- 2 cucharadas de cacao en polvo sin azcar
- 1/4 taza de chispas de chocolate oscuro pequeas, o chocolate oscuro finamente picado
- 2 cucharadas de jarabe de arce
- 1/3 taza + 1 cucharada de ron oscuro, y un poco ms si es necesario
- Para el rebozado:
- 3 tazas de coco rallado endulzado
- 280 g de chocolate blanco, picado en trozos pequeos
Instrucciones
Paso 1:
En un procesador de alimentos, coloca las galletas de vainilla, el azcar glas, el cacao en polvo y las chispas de chocolate. Pulsa de forma intermitente hasta que la mezcla est finamente triturada.
Paso 2:
Agrega el jarabe de arce y el ron oscuro al procesador. Procesa hasta que la mezcla se convierta en una masa firme pero moldeable. Si la masa est muy seca y se desmenuza al intentar formar las bolitas, aade un poco ms de ron hasta conseguir la consistencia deseada.
Nota del chef:
En este punto, puedes elegir rebozar las bolitas en azcar glas. Simplemente forma las bolitas, cbrelas con el azcar y refrigralas hasta que estn listas para servir.
Paso 3:
Con las manos, toma porciones de la mezcla y forma bolitas de aproximadamente 2.5 a 4 cm de dimetro. Colcalas sobre un plato, cbrelas con plstico transparente y refrigralas mientras preparas el recubrimiento de chocolate blanco.
Paso 4:
En un bol poco profundo, coloca el coco rallado y resrvalo para el rebozado.
Paso 5:
Prepara un bao Mara colocando un bol resistente al calor sobre una cacerola con agua a fuego bajo. Aade todo el chocolate blanco, excepto aproximadamente un 20% de la cantidad. Deja que se derrita sin revolver hasta que la mayora del chocolate est derretido, y la temperatura del chocolate alcance los 41C (105F), utilizando un termmetro de cocina para verificar.
Paso 6:
Incorpora el chocolate blanco reservado y mezcla hasta que el recubrimiento quede suave y fluido.
Paso 7:
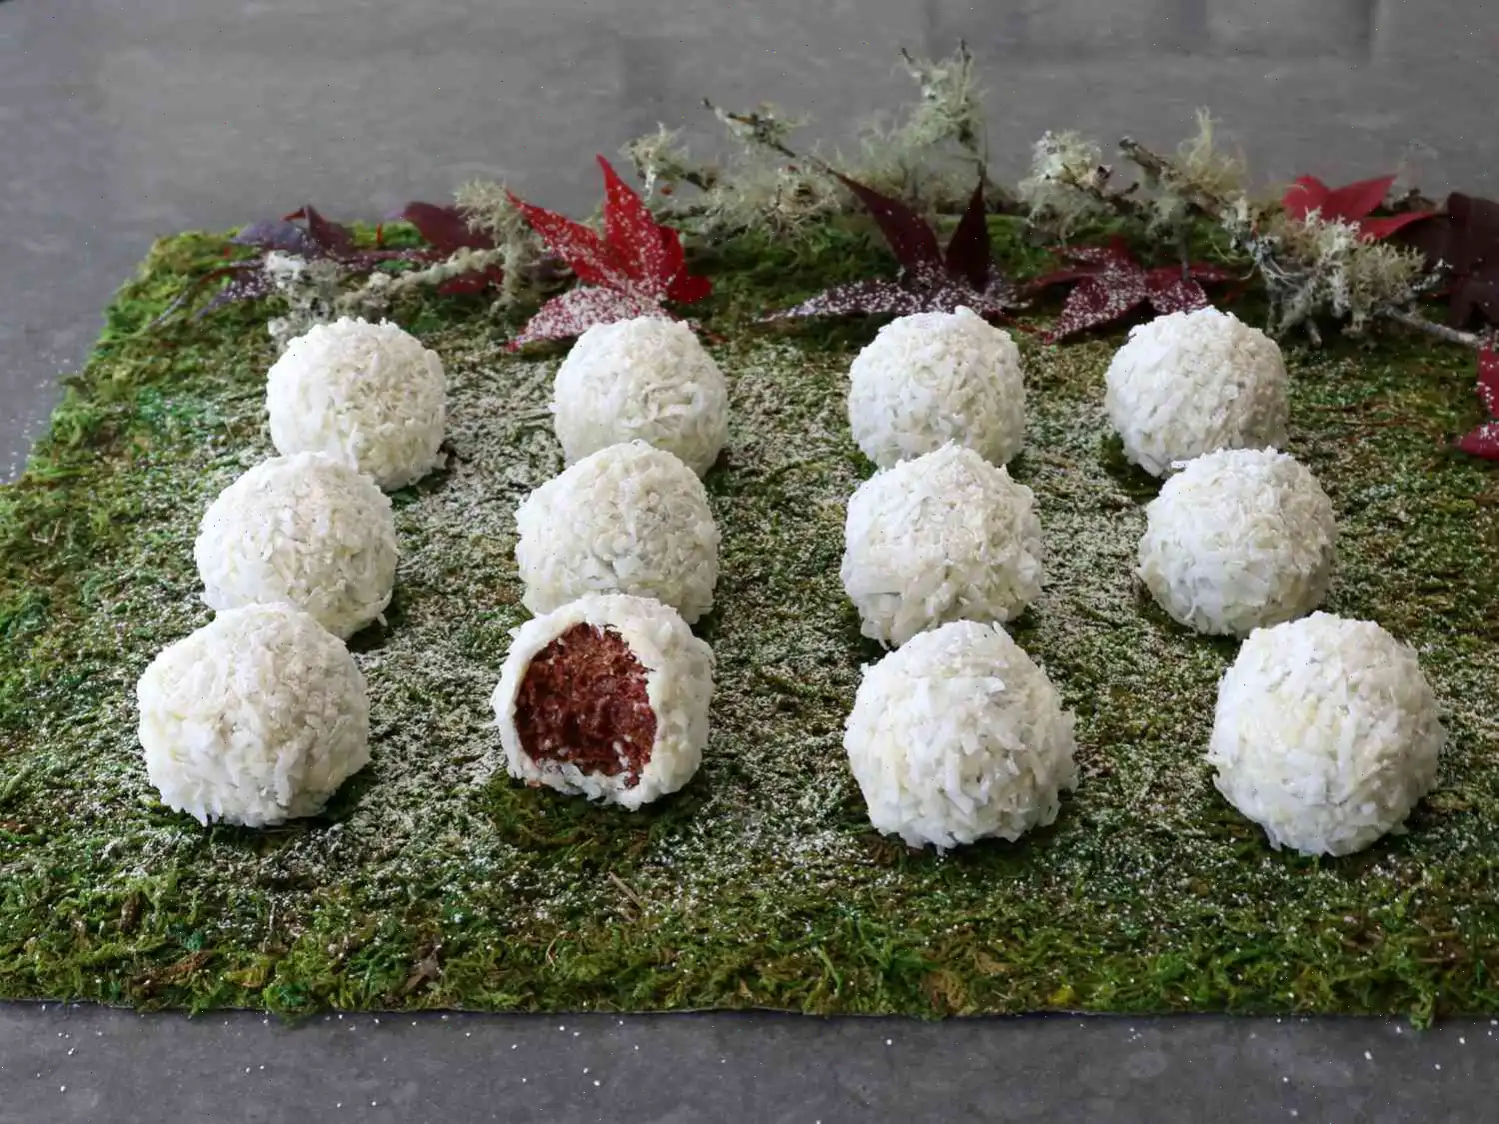
Introduce cada bolita de ron en el chocolate blanco derretido y, con dos tenedores, grala hasta que est completamente cubierta. Deja que el exceso de chocolate escurra antes de transferirla al bol con el coco rallado. Gira la bolita para cubrirla uniformemente con el coco.
Paso 8:
Usa las manos para presionar suavemente el coco contra la capa de chocolate blanco para asegurar que se adhiera bien. Coloca las bolitas ya cubiertas sobre un plato y repite este proceso con el resto de las bolitas.
Paso 9:
Si el chocolate blanco empieza a endurecerse durante el proceso de cobertura, simplemente vuelve a colocar el bol sobre el bao Mara para reactivarlo.
Paso 10:
Una vez que todas las bolitas estn recubiertas, envulvelas en plstico transparente y refrigralas hasta el momento de servir. Estas bolitas de ron son ms sabrosas cuando se hacen con antelacin y se dejan reposar por al menos unas horas, o incluso un da completo.
Consejos del chef:
- Puedes sustituir el ron oscuro por cualquier licor de tu preferencia.
- Quedar sobrante de chocolate blanco y coco rallado, pero es necesario para recubrir bien todas las bolitas.
- Si deseas ms detalles sobre cmo hacer la cobertura de chocolate blanco, consulta nuestra receta de "Nipples of Venus", mencionada en el video.
Informacin nutricional (por porcin)
- Caloras: 208
- Grasas totales: 10g
- Grasas saturadas: 6g
- Colesterol: 3mg
- Sodio: 94mg
- Carbohidratos totales: 28g
- Fibra diettica: 1g
- Azcares totales: 20g
- Protenas: 2g
- Calcio: 27mg
- Hierro: 0mg
- Potasio: 96mg
Autor: John Mitzewich
Descripcin
Estas bolitas de nieve con ron y chocolate aaden un toque festivo a la receta clsica de bolitas de ron, que son unas de las galletas ms fciles y deliciosas que no requieren horno. Para lograr el efecto de "bola de nieve", estas se cubren con chocolate blanco y luego se enrollan en coco rallado, pero tambin puedes terminarlas de manera ms sencilla cubrindolas generosamente con azcar en polvo.
Historia de las Bolitas de Nieve con Ron y Chocolate
Las Bolitas de Nieve con Ron y Chocolate son una variante moderna de la clsica bolita de ron, un postre sin horno que tiene sus races en el Caribe. Las bolitas de ron, originalmente hechas con restos de pastel o galletas y ron, han sido una tradicin durante la temporada navidea, especialmente en Estados Unidos. El giro de "bola de nieve", sin embargo, es un guio a las festividades invernales y los paisajes nevados, aadiendo una capa festiva de chocolate blanco y coco que hace que el dulce sea tanto delicioso como visualmente atractivo.
Caractersticas Regionales
Las bolitas de ron son un dulce comn en muchas regiones, pero esta variante particular est muy influenciada por las tradiciones navideas estadounidenses. La combinacin de ron oscuro, cacao y coco es una mezcla tpicamente festiva, que aparece a menudo en reuniones navideas, fiestas de Navidad y celebraciones de Nochevieja. Aunque las bolitas de ron son populares en toda Amrica, la adicin de chocolate blanco y coco le da un toque distintivo y estadounidense a este querido postre.
Caractersticas Distintivas
Lo que distingue a las Bolitas de Nieve con Ron y Chocolate de otros dulces similares es su combinacin de ron oscuro y chocolate blanco, creando un perfil de sabor rico, dulce y ligeramente alcohlico. Mientras que las bolitas de ron tradicionales suelen enrollarse en azcar en polvo o cacao en polvo, la adicin de una capa de chocolate blanco y coco rallado hace que estas bolitas de nieve sean nicas. El contraste entre el suave y cremoso chocolate blanco y el coco masticable ofrece una textura satisfactoria, y el ron oscuro aporta profundidad al sabor general.
Dnde Se Suelen Servir?
Las Bolitas de Nieve con Ron y Chocolate se sirven comnmente durante la temporada navidea, especialmente en fiestas de Navidad y Nochevieja. Son el complemento perfecto para una bandeja de postres festivos, ofreciendo un dulce rico y decadente que combina bien con un vaso de ron o una bebida caliente navidea. Estas pequeas delicias tambin son populares en cestas de regalo o como dulces caseros para amigos y familiares, a menudo hechas con antelacin para permitir que los sabores se fusionen mejor.
Datos Curiosos
- Las bolitas de ron son un postre sin horno, lo que las convierte en una opcin fcil y rpida para la repostera navidea.
- Aunque el ron es un ingrediente tradicional, puedes sustituirlo por otros licores como whisky o brandy, segn tu preferencia.
- El nombre "bolitas de nieve" proviene de la capa polvorienta y nevada de chocolate blanco y coco rallado, que le da a los dulces su apariencia festiva.
- Las bolitas de ron se pueden hacer con hasta una semana de antelacin, lo que las convierte en un dulce ideal para los ajetreados horarios navideos.
Conclusin
Las Bolitas de Nieve con Ron y Chocolate son una deliciosa variante de un dulce clsico. Su combinacin nica de ron oscuro, cacao rico, chocolate blanco suave y coco rallado las convierte en una adicin memorable a cualquier mesa navidea. Ya sea que ests organizando una fiesta o buscando un regalo casero, estas bolitas indulgentes seguramente impresionarn y aadirn un toque de alegra festiva a tus celebraciones.
Puedes escuchar esta receta en formato de audio de IA. Simplemente haz clic en el botón de reproducción a continuación para escuchar el contenido en el formato que mejor te convenga. ¡Es una excelente manera de absorber información sobre la marcha!
Preguntas frecuentes sobre Receta de Bolitas de Nieve de Chocolate y Ron
Compartir
Comentarios
Kimberly Perez
03/17/2025 10:24:18 PM
¡Una palabra: ¡Deliciosas! 😋
Adam Wilson
05/08/2023 04:42:54 AM
Chef John, tengo que decir cuánto me encantan tus publicaciones. Cuando vi el adelanto de tu última receta, supe que sería perfecta para fiestas como sugeriste. Después de ver el video en YouTube, pensé que podría improvisar con lo que teníamos en la despensa. ¡Resultó que estaba equivocado! Lección aprendida: siempre revisar los ingredientes antes de empezar. Terminé haciendo varias visitas de emergencia al supermercado porque nos faltaban algunos ingredientes clave. A pesar de mi improvisación, la receta quedó genial. Puede que haya calculado mal las proporciones y la mezcla de chocolate quedó un poco seca. Añadí algunas galletas con mantequilla para humedecerla, y el resultado siguió siendo delicioso. Terminé haciendo muchas más galletas de las esperadas y tuve que refrigerarlas antes de cubrirlas con chocolate blanco. Sin embargo, tuve un pequeño problema cuando el chocolate se endureció a mitad del proceso. Solucioné agregando un poco de aceite de coco para aligerar el chocolate y continuar con la cobertura. Al final, quedaron maravillosas. ¡Sigue compartiendo tus increíbles recetas, Chef John, nos encanta probarlas!


 audio version


CookGuide es tu guía culinaria para descubrir nuevos sabores y cocinar con confianza. Encuentra recetas de confianza, consejos prácticos e inspiración tanto para cocinas domésticas como profesionales.
Cualquier copia, distribución o uso de los materiales de este servicio sin autorización está estrictamente prohibido. Las infracciones serán procesadas según la legislación aplicable y pueden dar lugar a responsabilidades civiles y penales.
© Guía de cocina Studio 2026 | Cookies | Política de PrivacidadEncuentra la receta perfecta con IA. Solo introduce los ingredientes y deja que Cook te guíe hacia la magia.