
Receta de Turrón (Dulce Italiano de Nueces y Mazapán)
El turrón es un dulce tradicional italiano hecho con frutos secos, miel y claras de huevo. Este dulce es perfecto para las fiestas o como un regalo especial para amigos y familia. Con su textura crujiente y sabor intenso, el turrón seguro que encantará a todos los que lo prueben. ¡Sigue esta receta fácil para hacer tu propio turrón delicioso en casa!
Rinde: 40 porciones
Ingredientes
- 2 hojas de papel oblea comestible (aprox. 20x25 cm)
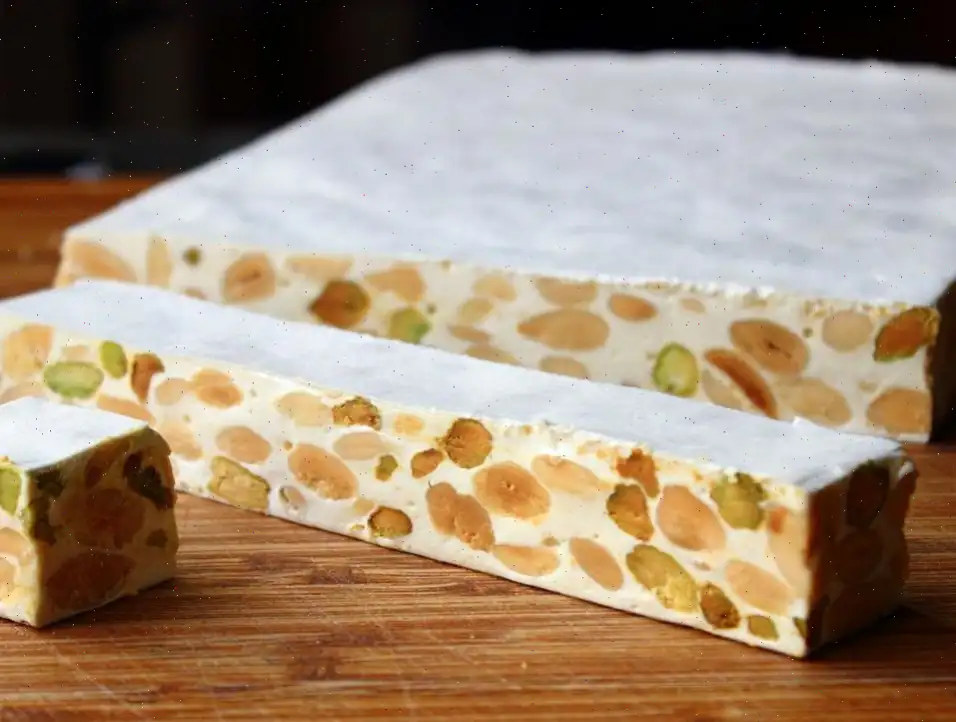
- 3 tazas de almendras tostadas
- 1 taza de pistachos tostados
- 1 tazas de miel mbar clara
- 1 taza de azcar blanca
- 3 cucharadas adicionales de azcar blanca
- 2 claras de huevo grandes, a temperatura ambiente
- 1 pizca de sal
- 1 cucharada de ralladura de limn
- cucharadita de extracto de vainilla
Preparacin
- Forra un molde de 22x28 cm con film transparente, dejando los bordes colgando. Coloca una hoja de oblea en la base del molde.
- Deja que las almendras y los pistachos se templen para que se mezclen con facilidad ms adelante.
- Vierte la miel en una cacerola de fondo grueso y aade la taza de azcar junto con las tres cucharadas adicionales. Cocina a fuego bajo, removiendo constantemente hasta que la mezcla pase de granulosa a cremosa, aproximadamente 30 minutos. Retira del fuego.
- En un recipiente limpio, bate las claras con una pizca de sal hasta formar picos suaves, alrededor de 3 a 4 minutos.
- Regresa la miel al fuego bajo y aade poco a poco de las claras batidas, mezclando con varillas. Incorpora el resto de las claras en tres tandas, asegurando una mezcla homognea entre cada adicin.
- Cocina a fuego lento, moviendo constantemente, hasta que la preparacin adquiera un color blanco brillante y su textura sea espesa. La mezcla debe formar una cinta en la superficie que se mantenga 4 a 5 segundos antes de desaparecer, lo que tarda unos 40 minutos. Para comprobar, deja caer un poco en agua helada; debe sentirse como arcilla firme al tocarla.
- Agrega la ralladura de limn y la vainilla, mezclando uniformemente.
- Incorpora las almendras y los pistachos tibios y revuelve hasta que estn distribuidos de manera pareja.
- Vierte la preparacin en el molde preparado y nivela la superficie con una esptula limpia y engrasada.
- Cubre con la segunda hoja de oblea, con el lado brillante hacia arriba. Coloca film transparente encima y presiona suavemente para compactar la mezcla de manera uniforme.
- Retira la capa superior de film y deja enfriar a temperatura ambiente hasta que el turrn est firme, aproximadamente 1 a 2 horas.
- Cuando est slido, levanta los bordes del film para desmoldar, voltea el turrn y quita el film de la base. Recorta los bordes si es necesario.
- Corta en cuadrados de aproximadamente 2,5 cm con un cuchillo de sierra afilado.
Consejo del Chef
Si no tienes papel oblea, puedes rociar ligeramente el film transparente con aceite vegetal. Evita el almidn de maz, no es indispensable y puede alterar la textura.
Informacin Nutricional (por porcin)
- Caloras: 137
- Grasa total: 7 g
- Grasa saturada: 1 g
- Sodio: 20 mg
- Carbohidratos: 18 g
- Fibra diettica: 2 g
- Azcares: 16 g
- Protena: 3 g
- Vitamina C: 0 mg
- Calcio: 31 mg
- Hierro: 1 mg
- Potasio: 118 mg
*Los valores diarios porcentuales se basan en una dieta de 2,000 caloras. Pueden variar segn tus necesidades energticas.
Preguntas frecuentes sobre Receta de Turrón (Dulce Italiano de Nueces y Mazapán)
Compartir
Comentarios
Larry Davis
03/03/2025 09:21:44 AM
Intenté hacer esta receta dos veces. La primera vez quedó un poco dura (no la tiré, solo agregué anacardos para salvarla). Me di cuenta de que mi estufa de propano calienta demasiado, así que en el segundo intento seguí la sugerencia de otro reseñador y coloqué mi olla ancha de fondo pesado de 6 qt sobre una sartén de hierro fundido en mi quemador más pequeño. También noté en el video del Chef Jon que nunca deja que la mezcla hierva, enfatizando la necesidad de un calor lento y bajo. Al batir los huevos, me aseguré de batirlos más tiempo la segunda vez porque aún parecían líquidos debajo. Después de agregar los huevos, revolví la mezcla durante 45 minutos, apagué la llama y continué revolviendo otros 5 minutos. ¡El resultado fue perfecto! Hice la receta de Turrón My Onee con cáscaras de naranja confitadas y albaricoques añadidos, junto con los ingredientes originales. ¡Gracias, Chef Jon, por la guía! Fue un proceso desafiante, pero definitivamente valió la pena.
Julie Sanchez
05/11/2024 10:55:02 PM
Hola a todos, he hecho esta receta cuatro veces y quería compartir mi experiencia con cada tanda. La primera vez seguí las instrucciones del Chef John al pie de la letra y el turrón quedó perfecto, aunque un poco más pegajoso de lo que esperaba. Se cortó bien y mantuvo su forma sin colapsar ni derretirse. Usé una cacerola de fondo pesado, miel BJs Wellesley Farms y mantuve el quemador en la posición más baja durante todo el proceso. Tenía todos los ingredientes y utensilios listos desde el principio. En mi segundo intento, cometí un gran error al agregar la vainilla y la ralladura a mitad de la cocción junto con las claras. Esto resultó en un sabor terrible y un color más oscuro en el turrón terminado. Además, extendí la segunda etapa de cocción 8-10 minutos para endurecerlo, lo que produjo un producto pegajoso y muy duro que no podía ni cortar. En la tercera tanda, usé otro tipo de miel de Trader Joe's. Esta vez, el turrón se espesó mucho más rápido en la segunda etapa, formando cintas después de solo 25 minutos. Preocupada por repetir la tanda demasiado dura anterior, lo retiré temprano. Desafortunadamente, esto produjo un turrón que nunca se asentó completamente y quedó pegajoso y desordenado, aunque seguía siendo delicioso. Lo terminamos comiendo así. En general, esta receta me enseñó la importancia del tiempo y seguir las instrucciones cuidadosamente. Cada intento trajo sus propias lecciones y desafíos, pero estoy decidida a perfeccionarla con práctica.
Rachel Gonzalez
12/13/2023 10:49:27 PM
Tengo la intención de preparar esta receta en el futuro e incorporaré un consejo de otra receta para reducir el tiempo de cocción y el batido en aproximadamente 40 minutos. Paso 2: Hervir el jarabe de miel hasta que alcance 290°F (usar un termómetro para caramelos), luego retirarlo del fuego. Paso 3: Una vez formadas picos suaves, verter gradualmente la mezcla de jarabe (no las claras) en la batidora a velocidad media. Paso 4: Ignorar el paso 4. En su lugar, cambiar la batidora a velocidad media-alta y batir la mezcla durante 5 minutos hasta que esté muy espesa, firme y brillante.


 audio version


CookGuide es tu guía culinaria para descubrir nuevos sabores y cocinar con confianza. Encuentra recetas de confianza, consejos prácticos e inspiración tanto para cocinas domésticas como profesionales.
Cualquier copia, distribución o uso de los materiales de este servicio sin autorización está estrictamente prohibido. Las infracciones serán procesadas según la legislación aplicable y pueden dar lugar a responsabilidades civiles y penales.
© Guía de cocina Studio 2026 | Cookies | Política de PrivacidadEncuentra la receta perfecta con IA. Solo introduce los ingredientes y deja que Cook te guíe hacia la magia.