
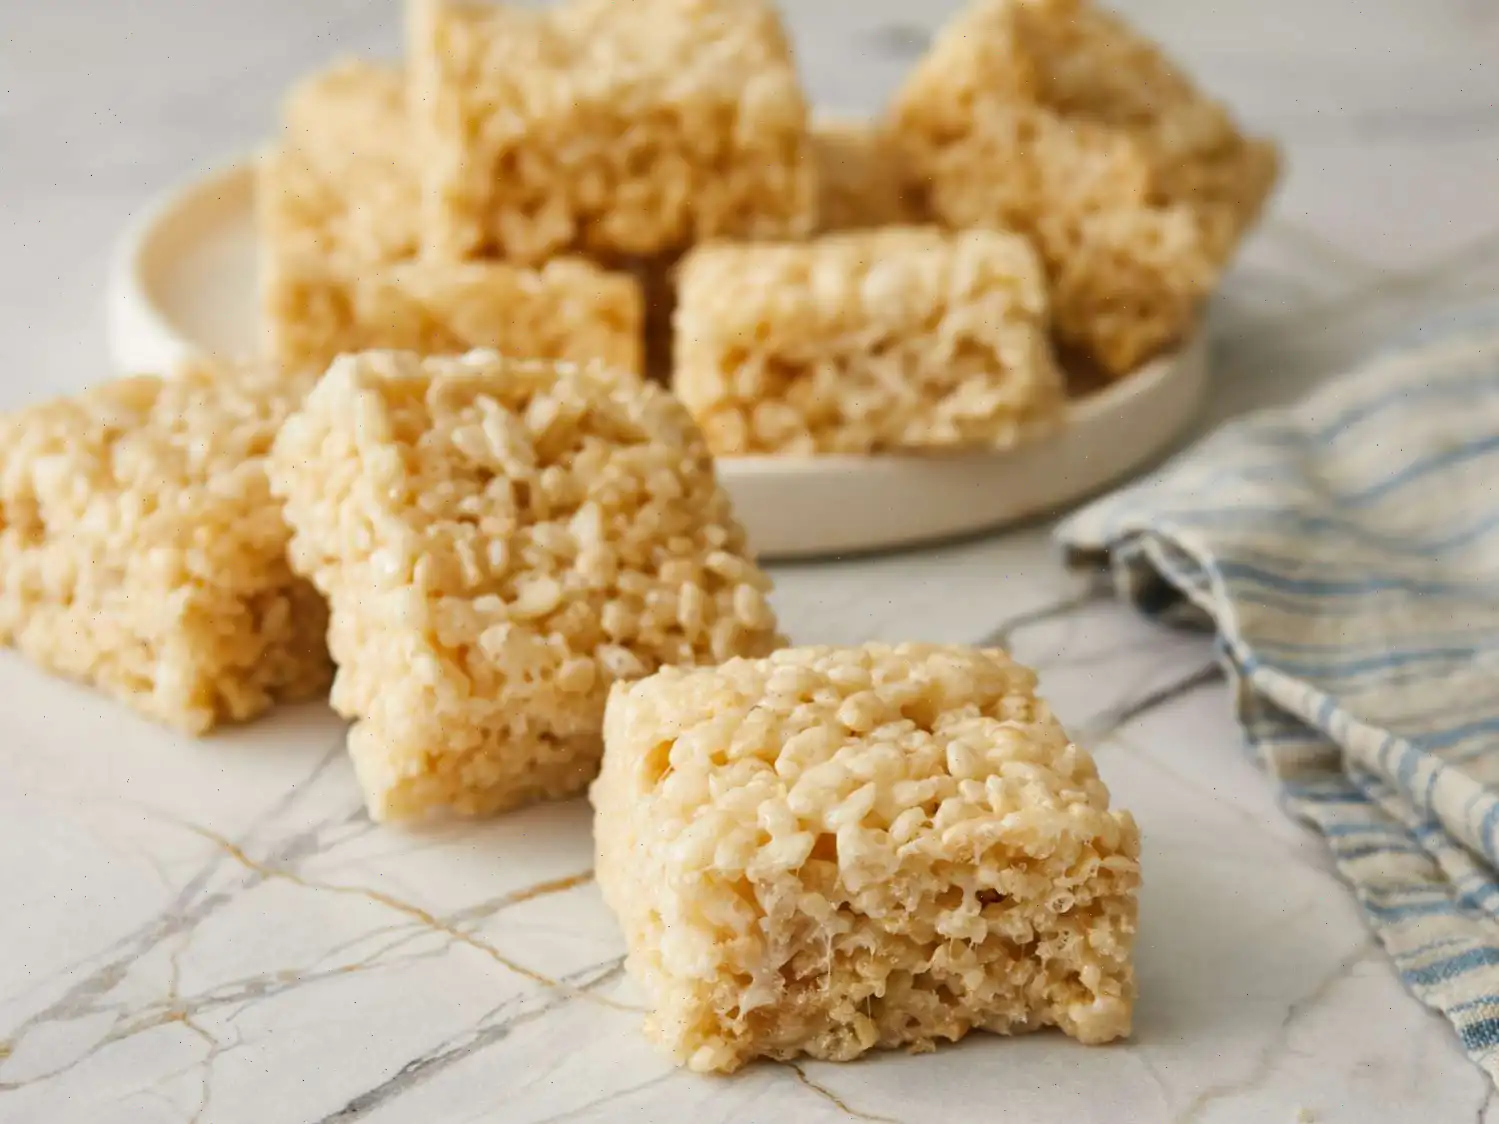
Receta de golosinas de arroz Krispies con malvaviscos
Los Marshmallow Rice Krispie Treats son un postre clásico y delicioso, perfecto para cualquier ocasión. Con solo unos pocos ingredientes, puedes preparar un lote de estas golosinas pegajosas y crujientes en muy poco tiempo. Ya sea que las hagas para una fiesta, una venta de pasteles o simplemente para darte un capricho, los Marshmallow Rice Krispie Treats seguro que serán un éxito. ¡Así que agarra tus ingredientes y prepárate para hacer unas delicias que a todos les encantarán!

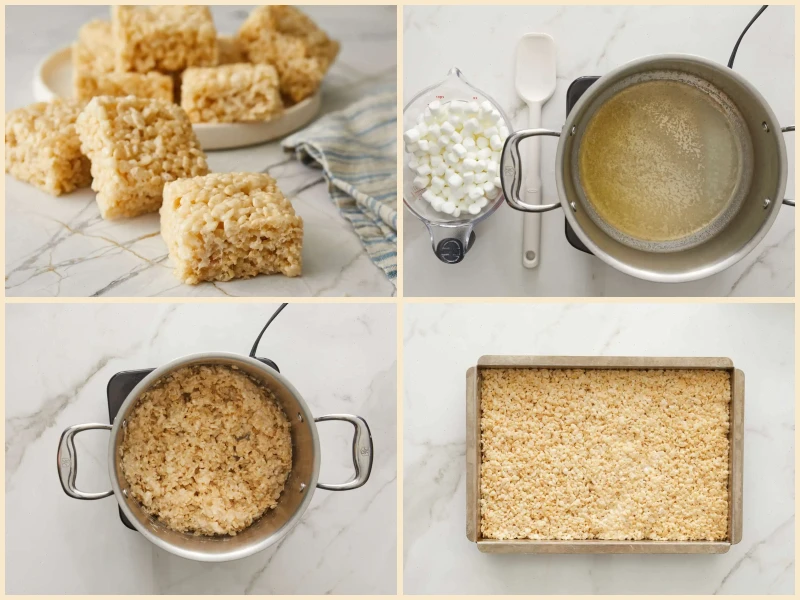
Ingredientes:
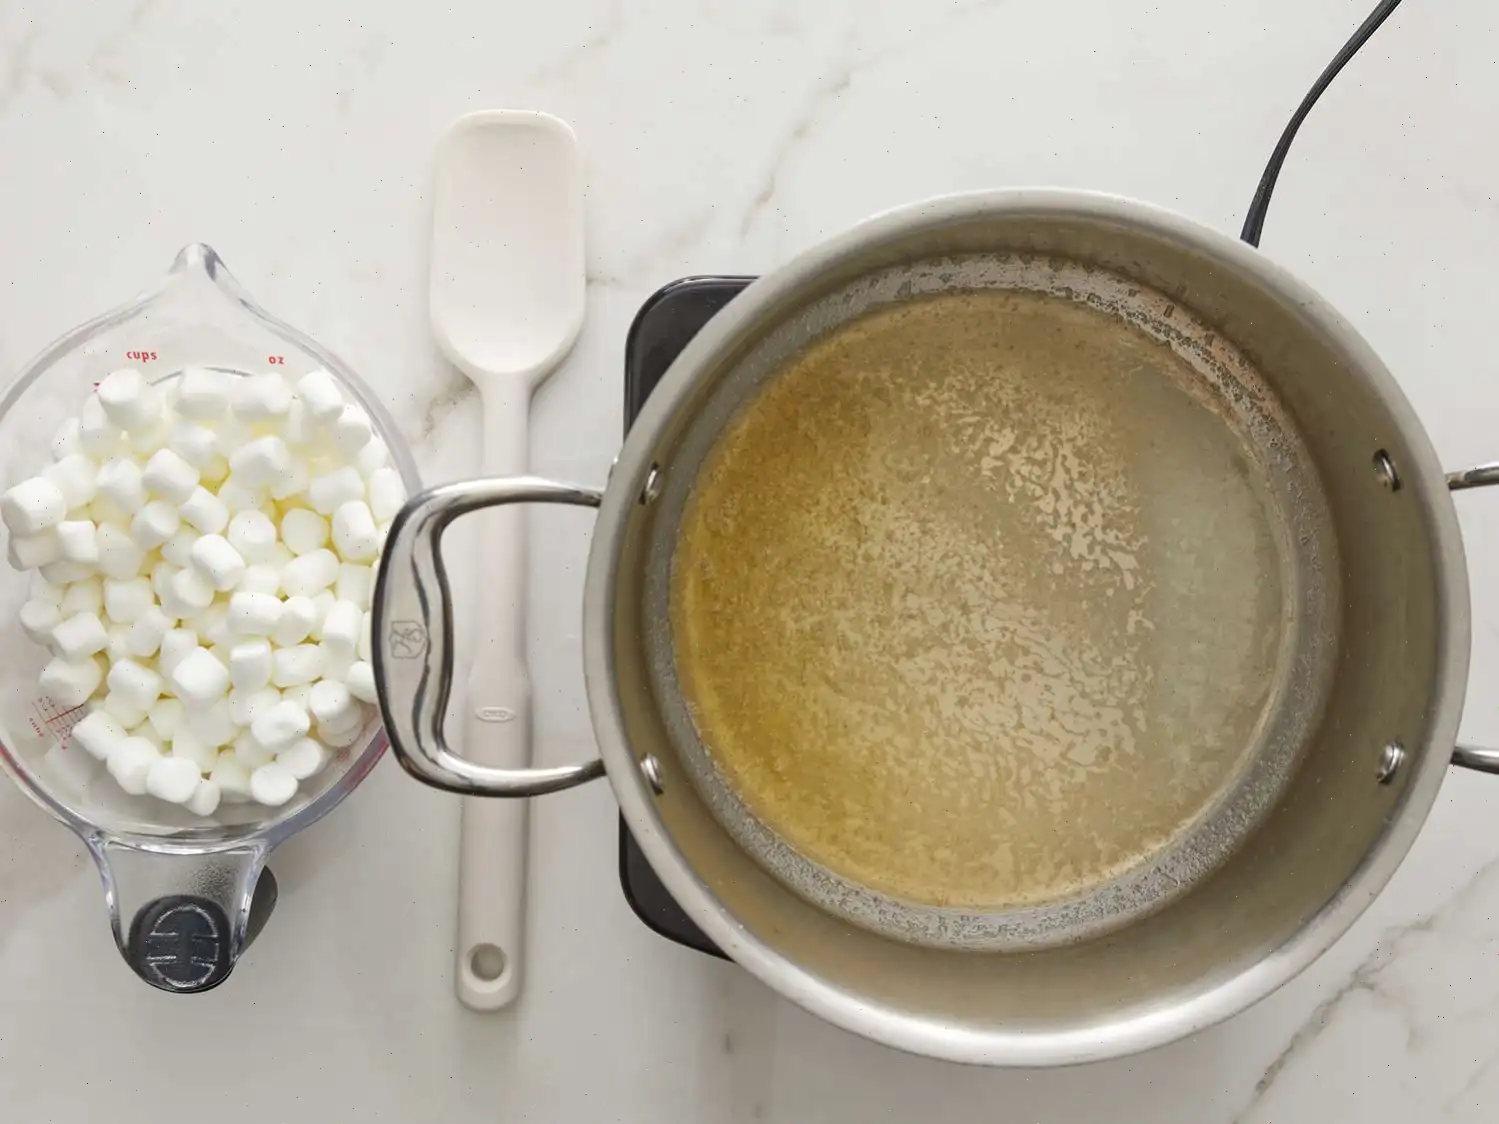
- 1/4 taza de mantequilla
- 4 tazas de malvaviscos miniatura
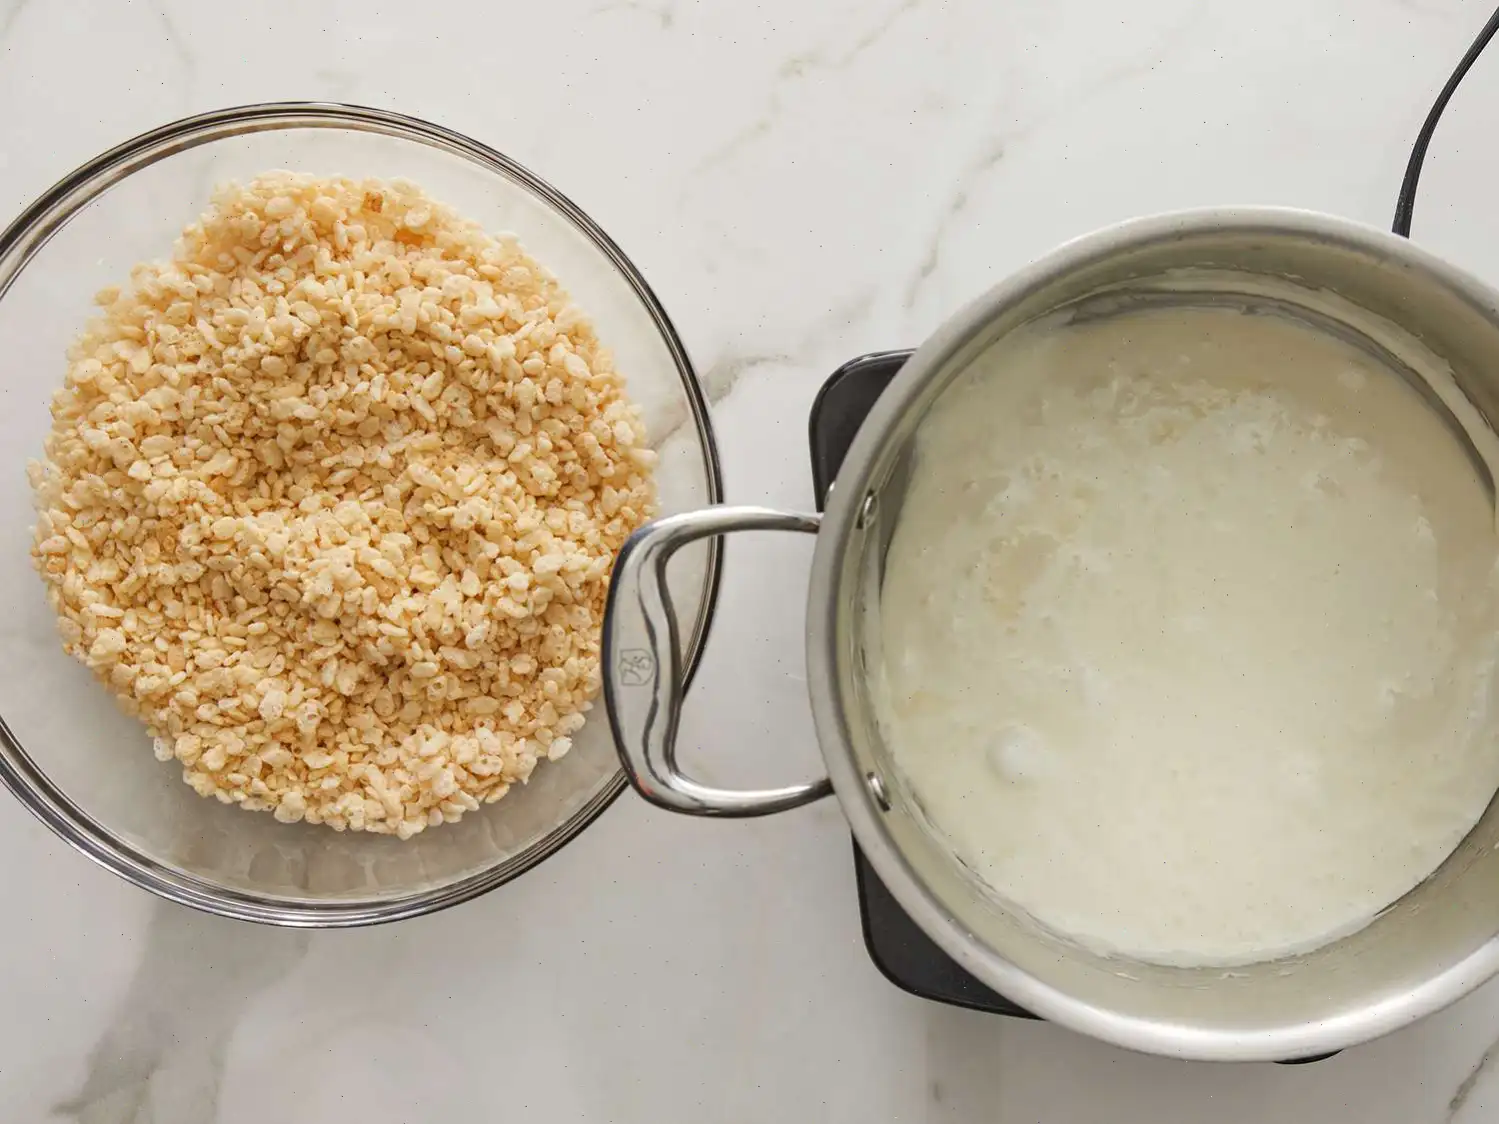
- 5 tazas de cereal de arroz crujiente
Instrucciones:
1. Coloca una cacerola grande en la estufa y derrite la mantequilla a fuego bajo.
2. Aade los malvaviscos a la cacerola y revuelve constantemente hasta que se derritan y se forme una mezcla suave, esto tomar aproximadamente 2 minutos. Asegrate de mezclar bien para que se integren perfectamente.
3. Retira la cacerola del fuego una vez que los malvaviscos estn completamente derretidos.
4. Incorpora el cereal de arroz crujiente, asegurndote de que quede bien cubierto por la mezcla de malvavisco.
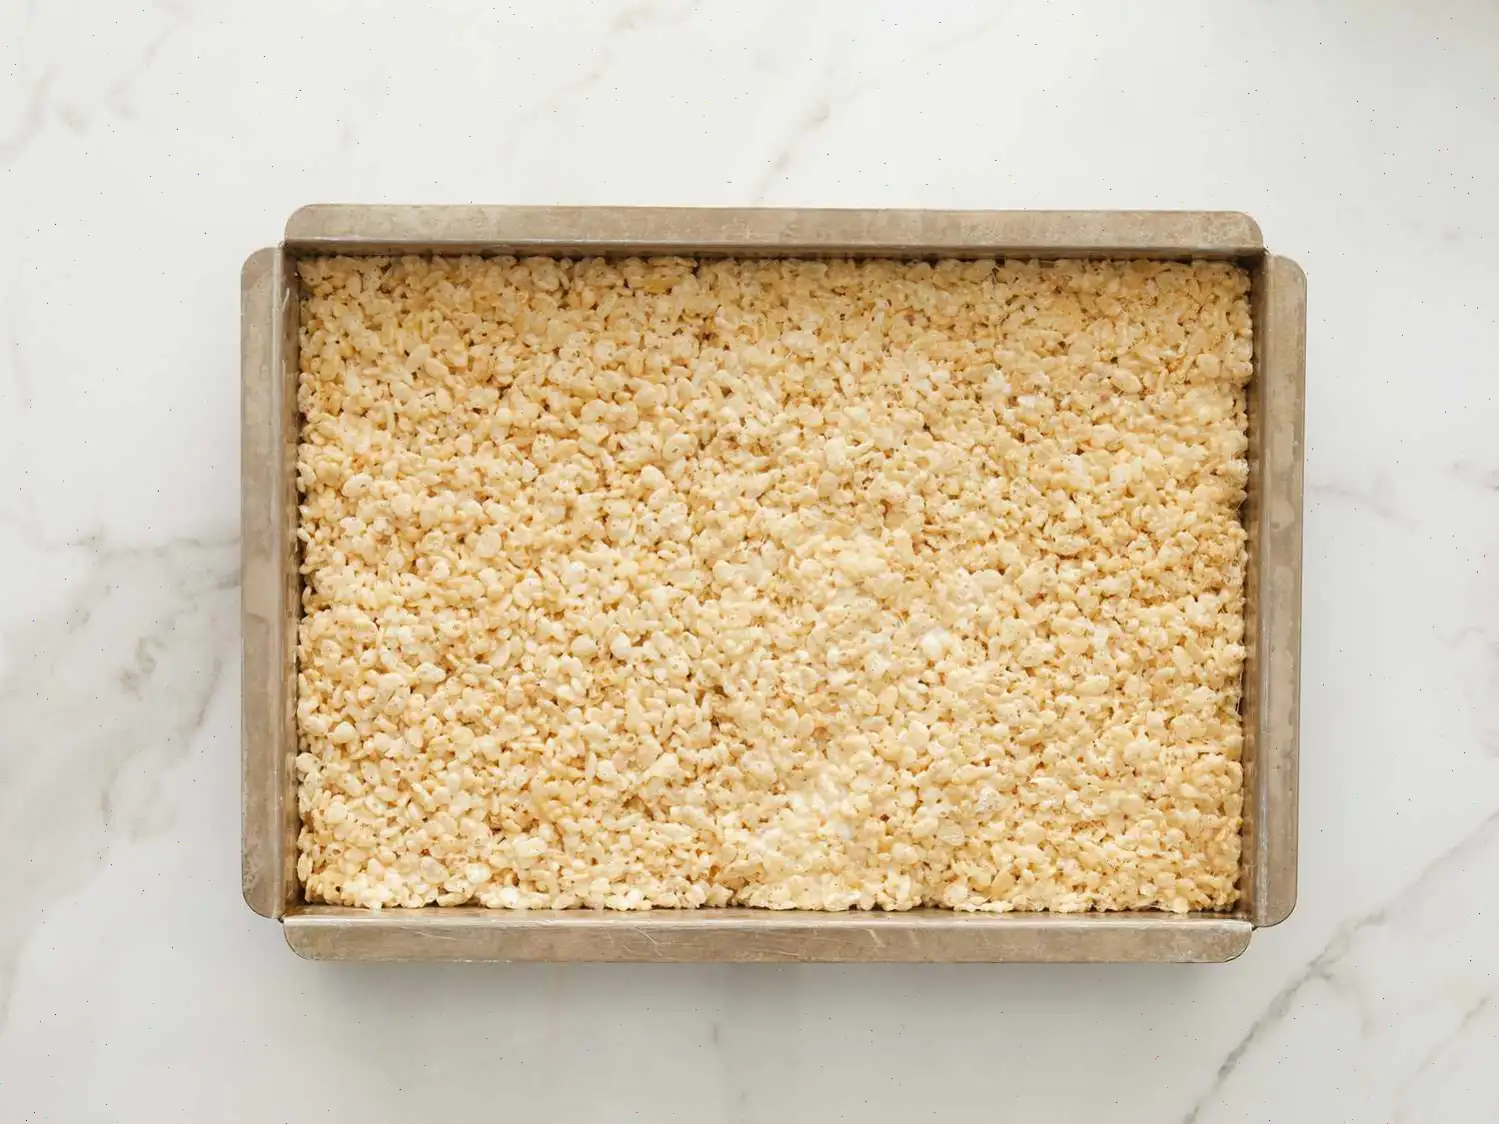
5. Transfiere la mezcla a un molde para hornear de 9x13 pulgadas previamente enmantecado. Utiliza una esptula enmantecada o un trozo de papel encerado para presionar la mezcla de manera uniforme y firme dentro del molde.
6. Deja que la mezcla se enfre completamente antes de cortarla en cuadrados de aproximadamente 2 pulgadas.
Consejo de Receta:
Guarda las galletas en un recipiente hermtico a temperatura ambiente por hasta 2 das o en el refrigerador por hasta 5 das para mantener su frescura.
Informacin Nutricional (por porcin):
- Caloras: 65
- Grasas Totales: 2g (3% del valor diario)
- Grasas Saturadas: 1g (6% del valor diario)
- Colesterol: 5mg (2% del valor diario)
- Sodio: 65mg (3% del valor diario)
- Carbohidratos Totales: 12g (4% del valor diario)
- Azcares Totales: 5g
- Protenas: 1g (1% del valor diario)
- Vitamina C: 4mg (4% del valor diario)
- Calcio: 1mg (0% del valor diario)
- Hierro: 2mg (11% del valor diario)
- Potasio: 7mg (0% del valor diario)
Las Golosinas de Arroz Krispies con Malvaviscos son un postre sencillo pero irresistiblemente delicioso que ha sido un favorito tanto de nios como de adultos durante dcadas. Estas cuadrculas pegajosas y crujientes combinan la ligereza crujiente del cereal de Arroz Krispies con la dulzura de los malvaviscos derretidos y la mantequilla. Con solo tres ingredientes, son rpidas de preparar y ofrecen un tentempi satisfactorio que no requiere hornear. Esta receta atemporal se disfruta a menudo como merienda despus de la escuela, golosina en fiestas o un simple postre.
Historia y Origen
Las Golosinas de Arroz Krispies con Malvaviscos fueron introducidas por primera vez en 1939 por la compaa Kellogg. Originalmente, fueron creadas como una forma de publicitar el cereal Arroz Krispies y aprovechar la versatilidad del producto en la repostera. La receta original fue publicada en el libro de cocina de Kelloggs para nios y rpidamente se hizo popular debido a su facilidad de preparacin y su sabor atractivo. La combinacin de Arroz Krispies, malvaviscos y mantequilla ha resistido la prueba del tiempo, convirtindose en un postre muy querido en los hogares estadounidenses y en muchas partes del mundo.
Variaciones Regionales y Adaptaciones
Aunque la receta clsica de las Golosinas de Arroz Krispies con Malvaviscos es bastante uniforme, con los aos han surgido variaciones regionales. Por ejemplo, en algunas regiones de los Estados Unidos se puede aadir mantequilla de man a la mezcla, lo que enriquece el sabor con un toque de nuez. En otras reas, las personas pueden usar chispas de chocolate o rociar chocolate derretido sobre las golosinas para agregar una capa extra de decadencia. Estas variaciones muestran la versatilidad del postre, hacindolo adaptable a diferentes gustos y preferencias.
Diferencias con Otros Postres Similares
Si bien las Golosinas de Arroz Krispies con Malvaviscos comparten algunas similitudes con otros postres sin hornear, como las barras de chocolate o avena, se destacan por su textura aireada y su crujido ligero. A diferencia de las galletas o brownies tradicionales, las Golosinas de Arroz Krispies ofrecen una consistencia crujiente y masticable completamente diferente. La combinacin nica de malvaviscos y mantequilla crea un centro suave y pegajoso que contrasta maravillosamente con el crujido del cereal, lo que las convierte en un postre distintivo por derecho propio.
Dnde Se Sirven Tpicamente
Estas golosinas son increblemente populares en una variedad de eventos, desde fiestas de cumpleaos hasta funciones escolares y reuniones familiares informales. Son un xito en los picnics y en los potlucks, donde su sabor sencillo pero delicioso puede ser disfrutado tanto por nios como por adultos. Gracias a su portabilidad y facilidad de preparacin, las Golosinas de Arroz Krispies con Malvaviscos se consideran a menudo el tentempi perfecto para eventos al aire libre, ventas de pasteles escolares y celebraciones festivas como Halloween y Navidad.
Curiosidades sobre las Golosinas de Arroz Krispies
- A pesar de su simplicidad, estas golosinas se personalizan a menudo con diferentes ingredientes, como chispas de chocolate, chicles o caramelos.
- En 1990, las Golosinas de Arroz Krispies fueron las protagonistas de un float especial con temtica de cereales en el Desfile del Da de Accin de Gracias de Macy's, demostrando su estatus como un postre amado en Amrica.
- Algunas personas prefieren meter los malvaviscos y la mantequilla en el microondas para acelerar la preparacin, haciendo de este un snack rpido y sin hornear.
- Este postre tambin se utiliza como base para recetas de postres ms elaborados, como pasteles de Golosinas de Arroz Krispies o barras en capas con glaseado.
Conclusin
Ya sea que los prepares para una fiesta, los metas en una lonchera o simplemente tengas antojo de algo dulce, las Golosinas de Arroz Krispies con Malvaviscos ofrecen un bocado delicioso y nostlgico que contina siendo apreciado por personas de todas las edades. Su atractivo atemporal, la facilidad de preparacin y su textura deliciosamente pegajosa hacen de ellas un tentempi que nunca pasar de moda.
Preguntas frecuentes sobre Receta de golosinas de arroz Krispies con malvaviscos
Compartir
Comentarios
Barbara King
06/07/2024 04:23:20 PM
¡Receta fantástica! Le añadí mi toque personal, por supuesto ;) Seguí las medidas de mantequilla, malvaviscos y cereal de arroz, pero incluí un chorrito de leche, un poco de vainilla, una generosa cucharada de mantequilla de maní y lo coroné con algunos M&M de mantequilla de maní - ¡absolutamente espectacular! Usar el método del microondas fue un cambio total. Recomiendo usar un molde más pequeño o duplicar la receta como sugirieron otros. ¡Disfruta creando con esta receta clásica!
Joshua Carter
08/27/2023 06:19:13 AM
¿Quién puede resistirse a estos dulces? Incluso cadenas de café populares los ofrecen en sus panaderías, aunque suelen tener un precio alto. Ajusto los ingredientes ligeramente (1/4 taza de mantequilla, 50 malvaviscos normales o 5 tazas de mini malvaviscos, 6 tazas de Rice Krispies), pero el resultado sigue siendo delicioso: ¡masticable y pegajoso! Prefiero una versión más gruesa, así que los preparo en un molde de 9x9" engrasado. Para darle un toque extra, a menudo derrito una bolsa de 11 oz de chispas de chocolate con leche y lo pongo encima. ¡Absolutamente divino!
Steven Miller
03/21/2025 05:21:29 PM
¡Estas barras son fantásticas! Me emocioné un poco mezclando ingredientes, jaja. Añadí algunas chispas de chocolate sobrantes de otra receta, un par de barras de Hershey rotas y una generosa cucharada de mantequilla de maní. ¡Delicioso! No engrase el molde, en su lugar usé spray de cocina. Un truco útil: rocía tus manos con spray para presionar la mezcla sin que se pegue.

 audio version


CookGuide es tu guía culinaria para descubrir nuevos sabores y cocinar con confianza. Encuentra recetas de confianza, consejos prácticos e inspiración tanto para cocinas domésticas como profesionales.
Cualquier copia, distribución o uso de los materiales de este servicio sin autorización está estrictamente prohibido. Las infracciones serán procesadas según la legislación aplicable y pueden dar lugar a responsabilidades civiles y penales.
© Guía de cocina Studio 2026 | Cookies | Política de PrivacidadEncuentra la receta perfecta con IA. Solo introduce los ingredientes y deja que Cook te guíe hacia la magia.